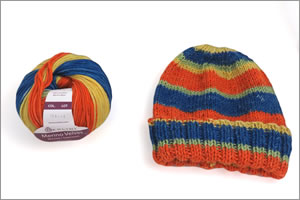
I had been wanting to knit a hat for quite some time now, so I asked my teacher, my avid knitter wife, for an easy hat pattern for beginner knitters. Knowing my skill level, or lack thereof, she gave me a really good one. It was a pattern for a hat that would be knit on straight needles and then seamed. Easy enough, yet I had to learn a few new skills, so let me tell you about my new adventure in getting from yarn to hat!
Saltillo Hat (Knit on Straight Needles)
The hat that I knitted is called ‘Saltillo Hat’. It takes its name from the City of Saltillo, a beautiful city and capital of the northeastern Mexican state of Coahuila. Founded in 1577 by Conquistador Alberto del Canto, it is the oldest settlement in northern Mexico. During the early 20th century, Saltillo was called the “Athens of Mexico” because of its beauty and number of famous intellectuals living there at the time. Today, Saltillo is called the “Detroit of Mexico” because of the numerous car making plants and auto parts companies.
The Saltillo Hat has four colors; orange, blue, green and yellow. I especially like these colors because they go well together and stand out. This is important to me, and quite useful, because I will be wearing this hat while snowboarding so that it will be easier for my companions to spot me at the bottom of the slope. I am not the best snowboarder of the group, but I am the fastest!
In addition to the colors, I also like the pattern of the hat. It features a basic knit 2, purl 2 (K2, P2) ribbing for the bottom 5 inches and stockinette stitching for the rest of the hat. When you put it on and fold it up, this gives you 2 1/2 inches of ribbing which looks nice and contrasts well with the rest of the hat. The ribbing also provides warmth and makes the fit better.
New Skills I Needed to Learn
Okay, the pattern was really quite easy. In fact, you can have a look at the pattern, the yarn used, and instructions from the Free Patterns page of the NuMei website – Free Knitting Pattern: Saltillo Hat (Knit on Straight Needles).
The first skill I needed to learn was how to knit 2, purl 2 (K2,P2). This sounds so much easier than it actually is. There are so many things that can go wrong if you are not paying close attention. First, you have to manage the yarn so that it is in the right place for the stitch you are doing; yarn behind the needle for a knit stitch, yarn in front of the needle for a purl stitch. Then, you have to do the correct stitch. It is very easy to become distracted and do the wrong stitch or forget about the position of the yarn. This makes a mess of things. I did this a lot and had to frog out my work on more than a few occasions!
The second skill I needed to learn was how to knit two together (K2tog). I had done this before a couple of times and always struggled with getting my needle through both loops as well as pulling the yarn through without it dropping off the needle. Once again, the better I was able to maintain my yarn tension, the easier everything went. My yarn tension and my knitting is still too tight. This makes knitting one stitch harder than it needs to be and it makes knitting two stitches together almost impossible.
The third skill I needed to learn was how to follow the pattern. Admittedly, I get distracted easily. And, almost always I am KWWS – that is, Knitting While Watching Something. KWWS is not that hard when taking in the evening news, but it can be very difficult when enjoying a good movie or favorite TV show. After making several mistakes forgetting which row I was knitting and losing my stitch count when decreasing, my avid knitter wife gave me some stitch markers and a row counter and explained to me how to use them.
At first, I was reluctant to use the stitch markers and row counter because I thought it would be extra work. But, was I wrong..! They made decreasing and keeping track of the row I was knitting much easier. By using the stitch markers, I didn’t have to count my stitches as I knitted them. All I had to do was knit up to the last two stitches before the stitch marker and then knit the two stitches together. And the little row counter that my avid knitter wife gave me was also helpful; the value of not forgetting my row count was well worth the trivial effort to use it.
The last skill I had to learn was seaming the hat together to finish it. Turns out, there are lots of different ways to seam; the mattress stitch seam, (invisible vertical), the Kitchener stitch seam (invisible horizontal), the three-needle bind off seam, the whip stitch seam, the back stitch seam, the slip stitch crochet seam, and the overcast seam – to name a few.
After a bit of help from my avid knitter wife, I opted for the Mattress Stitch Seam. It is super easy to do and makes the seam invisible from the correct side, the outside of the hat. You will have a ridge on the wrong or inside of the hat which is only visible when you turn up the knitted hat. For that reason, I wear my hat with the seam in the back, so it basically goes unnoticed.
From yarn to hat. What a project, what an adventure! I just had a thought. What would it look like if all six of us snowboarding had on the same, beautiful, stylish, and warm Saltillo Hat? I think we will just have to see!

